Introducing variables with Scratch and Makey Makey
It is possible to use the Makey Makey for than a keyboard that makes bananas an inedible mush.
This project will be creating switches to collect data for a survey. This could be modified to encourage students to collect data using an alternate method to forms.
Student can modify the project to collect data to test understanding or collect information for a survey.
It could be used by teachers to test student knowledge when they leave a classroom. This is designed as a simple introduction to variables. There are other ways to make this more efficient code but the purpose of this lesson is to introduce the concept of variables.
Target Group
Year 4-6. Students have simple coding experience with block coding and ready to progress to the next step.
Concepts covered:
- Introductory coding
- Variables
- Digital Systems
Variables
What is variable?
A variable is used in a computer program, this is a named memory location where values are stored. A variable may be used to store values that change or need to be used during the program. For example a score or time value.
To learn more about variables watch this youTube.
Making a switch
Resources
- Light cardboard cut into rectangles (upcycled cereal boxes)
- Aluminium Foil
- Pom Poms
- Glue
- Makey Makey
- scratch.mit.edu
- Sample Code
- One male to male wire included in the makey makey box
- 7 alligator (crocodile) clips
Construct the Switch
- Cover the end of each rectangle with foil (not the entire length)
- Fold the cardboard rectangles in half long ways and open.
- Glue a pom or piece of foam a quarter of the way from the end.
- Fold the cardboard in half again.
- You will need 6 switches
Make the code
How to create and use a variable created using Scratch 3.0.
Scratch.mit.edu blocks from January 2019
System
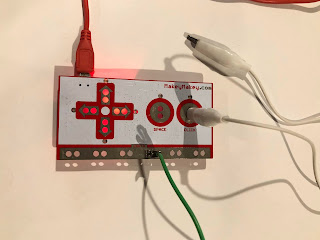
Connect the Makey Makey.
- Connect one alligator clip to the earth, silver bar along the bottom of the Makey Makey board.
- The earth wire may be held in your hand or attached to a switch or conductive bracelet. Ensure you skin is in contact with the metal of the alligator clip. Be careful of the clips as they can pitch the skin.
- Connect one end of the wires to each of the switches you made previously, ensure the metal of the alligator clip touches the aluminium foil.
- Connect the other end of the wire to each point on the Makey Makey.
- Left Arrow
- Right Arrow
- Up Arrow
- Down Arrow
- Space
- Turn the board over so you can see the back of the board.
- Connect one male to male wire to the W on the black outputs on the back of the board.
- Connect one end of the Alligator clip to the wire and the other to a switch.
- According the code above this will be the Volleyball switch.
- Connect the Makey Makey to the computer using the USB cord.
- Test the system works.
Debugging
Debugging is when your system doesn't work and you need to check for mistakes. You will need to check the following
- Check your code works by testing it on the keyboard without using your Makey Makey.
- Check your cords are correctly connected and all alligator clips are touching a conductive surface.
- Check your switches are constructed correctly and when pressed the foil on each side touches the metal on the alligator clip.
- Ensure you are touching the metal of the earth wire, either directly or via a conductive surface such as foil.


Comments
Post a Comment