Introducing Digital Systems to year 1/2
Year 1 and 2 are required to "Recognise and explore digital systems (hardware and software components) for a purpose (ACTDIK001)"
The Australian Computing Academy has unpacked what this means. They need to "name digital systems (e.g. smart phone or laptop) that they interact with at home and school and recognise that they are digital systems" they also need to "play (with guidance) and use different systems to explore what they do and how they work. They match digital systems to specific purposes (e.g. using a phone to call a family member)."
In NSW the above requirement is contained in the content of Outcome 11 in the Stage 1 Science and Technology Syllabus.
ST1-11DI-T identifies the components of digital systems and explores how data is represented
The purpose of the lessons below are to recognise and explore components of digital systems.
Read and discuss Hello Ruby, Journey inside a computer
This book may be read over several days.
See the HelloRuby.com for lesson ideas. Particularly Episode 6: Hardware.
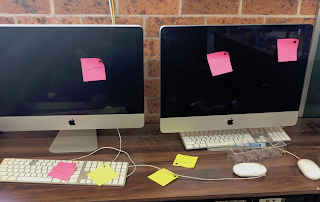
Give students a post-it note to place on a digital system or components of digital systems they can see in the classroom.
Instructions:
Students may include external components or internal components.
The Australian Computing Academy has unpacked what this means. They need to "name digital systems (e.g. smart phone or laptop) that they interact with at home and school and recognise that they are digital systems" they also need to "play (with guidance) and use different systems to explore what they do and how they work. They match digital systems to specific purposes (e.g. using a phone to call a family member)."
In NSW the above requirement is contained in the content of Outcome 11 in the Stage 1 Science and Technology Syllabus.
ST1-11DI-T identifies the components of digital systems and explores how data is represented
The purpose of the lessons below are to recognise and explore components of digital systems.
Lesson 1: Introduction
Watch and discussRead and discuss Hello Ruby, Journey inside a computer
This book may be read over several days.
See the HelloRuby.com for lesson ideas. Particularly Episode 6: Hardware.
Lesson 2: Identify Digital Systems and components in the classroom
Discuss how to identify a digital systems- Beeping
- Talks to you
- LED Display
- Remote control
- Blue cords for internet connection
- Bluetooth
- Multiple functions
- Buttons
- Alarms
- Buttons - Volume, power
- Microphone
- Attached to a computer

Give students a post-it note to place on a digital system or components of digital systems they can see in the classroom.
Instructions:
- One post it note per item or per component. Eg: Screen, Mouse, keyboard, volume buttons.
- Come and get another post it note each time you have found an item.
- Learning walk to identify post it notes
Lesson 3: Components of an iPad
- Identify components of an ipad
- Stick the ipad in a book.
- Cut our labels and place with an arrow to the appropriate place.
 Lesson 4: Draw what you think is inside a computer
It is up to the teacher to decide if you provide key words and spelling or just allow students to represent what they think is inside a computer. You may like to repeat this activity toward the end of the unit once students have done more research and have more knowledge.
Students may include external components or internal components.
If you have access to an old computer unscrew the case and show students what the inside of a computer looks like.
Lesson 4: Create your own computer
Paste the computer onto card from an old cereal box.
Discuss internal computer components.
Discuss parts of a computer.
Practise typing.
Lesson 5: Match up lesson.
Match up a device to the analogue equivalent and it's function.
What is inside a computer?
NESA NSW Outcome Continuum
https://aca.edu.au/curriculum/systems/
Reference
https://www.helloruby.com/lovelettersWhat is inside a computer?
NESA NSW Outcome Continuum
https://aca.edu.au/curriculum/systems/


Comments
Post a Comment